Error: git master matches more than one

Sometimes a tag will be on origin which has the same name as the branch. Windows in particular has an issue with this and will give you an error (git master matches more than one). You can delete the origin tag with the following code, then you’ll be able to push code to your master branch again using SourceTree

git push origin :refs/tags/master

If all else fails.. push in console mode using this line

 git push origin refs/heads/master 

Installing Gulp

Every new website uses gulp. Below is the code to start using it on a new project.

Install the npm init package:

npm init

Complete the npm init process populating all fields.

After, install gulp:

npm install gulp@3.9.0

And gulp dependencies:

npm install gulp-sass --save-dev; npm install gulp-concat --save-dev; npm install gulp-uglify --save-dev; npm install browser-sync --save-dev; npm install gulp-rename --save-dev;

If this is your first time using gulp in a new machine, we need to install the gulp-cli:

 npm install --g gulp-cli 

For more references, check the official documentation:

https://gulpjs.com/docs/en/getting-started/quick-start

Import large SQL files into Flywheel Local

Go to WordPress live website and download database using Migrate DB (Tools > Migrate DB). Install if not there.

The database will have the production URL populated in the Find column, in the Replace column enter your local URL (//website.local). Then download the database. Rename file to backup.sql and put in your websites files under {project_name}/app

Open Local by Flywheel and start your website. Right click again and find “Open Site SSH” and click. A terminal will open. Enter this code and press enter:

mysql -u root -proot -f local < /app/backup.sql

And you’re done!

See this article for more details: https://www.ibenic.com/import-databases-local-flywheel-sites/

Automatically assign parent taxonomy terms to posts

How it works:

Using hook set_object_terms anytime the categories are updated, this function will check whether they belong to a parent category and select the parent categories as well (and parent of parent, etc).

Note:

Do not use save_post to update categories.. because when you save a post where you only update the categories.. the save_post hook is not called.

add_action( 'set_object_terms', 'auto_set_parent_terms', 9999, 6 );
/**
 * Automatically set/assign parent taxonomy terms to posts
 *
 * This function will automatically set parent taxonomy terms whenever terms are set on a post,
 * with the option to configure specific post types, and/or taxonomies.
 *
 *
 * @param int    $object_id  Object ID.
 * @param array  $terms      An array of object terms.
 * @param array  $tt_ids     An array of term taxonomy IDs.
 * @param string $taxonomy   Taxonomy slug.
 * @param bool   $append     Whether to append new terms to the old terms.
 * @param array  $old_tt_ids Old array of term taxonomy IDs.
 */
function auto_set_parent_terms( $object_id, $terms, $tt_ids, $taxonomy, $append, $old_tt_ids ) {

    /**
     * We only want to move forward if there are taxonomies to set
     */
    if( empty( $tt_ids ) ) return FALSE;

    /**
     * Set specific post types to only set parents on.  Set $post_types = FALSE to set parents for ALL post types.
     */
    $post_types = array( 'post' );
    if( $post_types !== FALSE && ! in_array( get_post_type( $object_id ), $post_types ) ) return FALSE;

    /**
     * Set specific post types to only set parents on.  Set $post_types = FALSE to set parents for ALL post types.
     */
    $tax_types = array( 'category' );
    if( $tax_types !== FALSE && ! in_array( get_post_type( $object_id ), $post_types ) ) return FALSE;

    foreach( $tt_ids as $tt_id ) {

        $parent = wp_get_term_taxonomy_parent_id( $tt_id, $taxonomy );

        if( $parent ) {
            wp_set_post_terms( $object_id, array($parent), $taxonomy, TRUE );
        }

    }

}

jQuery – detect click event on pseudo-element

How it works:

It grabs the height, width, top, and left positions(based on the position away from the edge of the window) of the parent element and grabs the height, width, top, and left positions(based on the edge of the parent container) and compares those values to determine where the pseudo-element is on the screen.

It then compares where the mouse is. As long as the mouse is in the newly created variable range then it returns true.

Note:

It is wise to make the parent element RELATIVE positioned. If you have an absolute positioned pseudo-element, this function will only work if it is positioned based on the parent’s dimensions(so the parent has to be relative…maybe sticky or fixed would work too….).

Code:

function pseudoClick(parentElem) {

    var beforeClicked,
      afterClicked;

  var parentLeft = parseInt(parentElem.getBoundingClientRect().left, 10),
      parentTop = parseInt(parentElem.getBoundingClientRect().top, 10);

  var parentWidth = parseInt(window.getComputedStyle(parentElem).width, 10),
      parentHeight = parseInt(window.getComputedStyle(parentElem).height, 10);

  var before = window.getComputedStyle(parentElem, ':before');

  var beforeStart = parentLeft + (parseInt(before.getPropertyValue("left"), 10)),
      beforeEnd = beforeStart + parseInt(before.width, 10);

  var beforeYStart = parentTop + (parseInt(before.getPropertyValue("top"), 10)),
      beforeYEnd = beforeYStart + parseInt(before.height, 10);

  var after = window.getComputedStyle(parentElem, ':after');

  var afterStart = parentLeft + (parseInt(after.getPropertyValue("left"), 10)),
      afterEnd = afterStart + parseInt(after.width, 10);

  var afterYStart = parentTop + (parseInt(after.getPropertyValue("top"), 10)),
      afterYEnd = afterYStart + parseInt(after.height, 10);

  var mouseX = event.clientX,
      mouseY = event.clientY;

  beforeClicked = (mouseX >= beforeStart && mouseX <= beforeEnd && mouseY >= beforeYStart && mouseY <= beforeYEnd ? true : false); afterClicked = (mouseX >= afterStart && mouseX <= afterEnd && mouseY >= afterYStart && mouseY <= afterYEnd ? true : false);

  return {
    "before" : beforeClicked,
    "after"  : afterClicked

  };      

}

Usage:

$('.user-details-expand').click(function (e) {
  // console.log("Logging the object..." + JSON.stringify(pseudoClick(this)));
  // console.log("Before has been click..." + pseudoClick(this).before);
  // console.log("After has been clicked..." + pseudoClick(this).after);
  if ( pseudoClick(this).after==true) {
    $(this).hide();
  }
});

Support:

IT SEEMS TO WORK WELL IN ALL BROWSERS IF DIMENSIONS ARE SET IN CSS. So…set your height and width on your pseudo-elements and only move them with top and left. I recommend using it on things that you are okay with it not working on. Like an animation or something. Chrome works…as usual.

Add and Colour an SVG background

Add and Colour an SVG background

#swipebox-next {
	background-color: #000;
	mask: url('../images/Arrow.svg') no-repeat 50% 50%;
	-webkit-mask: url('../images/Arrow.svg') no-repeat 50% 50%;
}

Add SVG background with the default color and set the width and height

#swipebox-close {
	background-image: url('../images/Close_Black.svg');
	background-position: center;
	background-size: cover;
	right: 30px;
	top: 15px;
	width: 30px;
	height: 30px;
}

Input placeholder style

The ::placeholder pseudo element (or a pseudo class, in some cases, depending on the browser implementation) allows you to style the placeholder text of a form element. As in, the text set with the placeholder attribute:

You can style that text across most browsers with this smattering of vendor-prefixed selectors:

::-webkit-input-placeholder { /* Chrome/Opera/Safari */
  color: pink;
}
::-moz-placeholder { /* Firefox 19+ */
  color: pink;
}
:-ms-input-placeholder { /* IE 10+ */
  color: pink;
}
:-moz-placeholder { /* Firefox 18- */
  color: pink;
}

Important warning: this syntax is non-standard, thus all the naming craziness. It doesn’t appear in the spec at all. :placeholder-shown is standard, and even spec authors seem to think ::placeholder will be the standardized version.

Like any psuedo, you can scope it to specific elements as needed, like:

input[type="email"].big-dog::-webkit-input-placeholder {
  color: orange;
}

Prevent BODY from scrolling when a modal is opened

Bootstrap’s modal automatically adds the class modal-open to the body when a modal dialog is shown and removes it when the dialog is hidden. You can therefore add the following to your CSS:

body.modal-open {
    overflow: hidden;
}

You could argue that the above code belongs to the Bootstrap CSS code base, but this is an easy fix to add it to your site.

A workaround would be to add the class to the body when the modal is about to be shown, and remove it when the modal is closed:

$("#myModal").on("show", function () {
  $("body").addClass("modal-open");
}).on("hidden", function () {
  $("body").removeClass("modal-open")
});

Note: to prevent the underlying page from jumping left/right when showing/hiding modals.

body {
    // STOP MOVING AROUND!
    overflow-x: hidden;
    overflow-y: scroll !important;
}

Clearfix

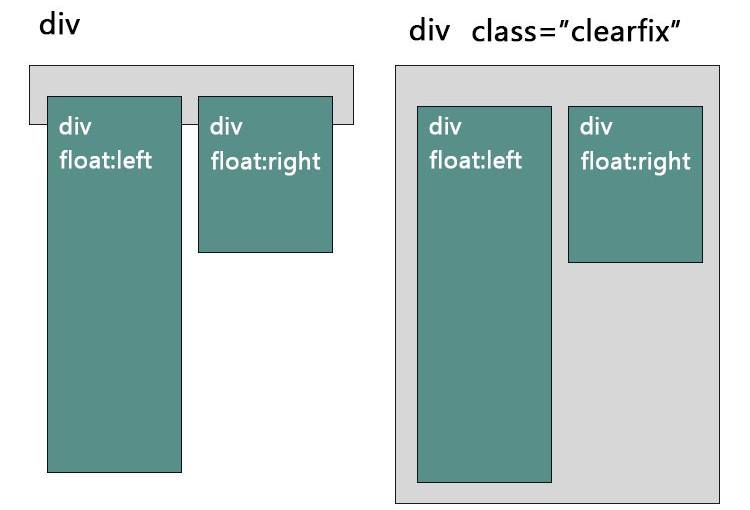
A clearfix is a way for an element to automatically clear its child elements, so that you don’t need to add additional markup. It’s generally used in float layouts where elements are floated to be stacked horizontally.

The clearfix is a way to combat the zero-height container problem for floated elements.

A clearfix is performed as follows:

.clearfix:after {
   content: " "; /* Older browser do not support empty content */
   visibility: hidden;
   display: block;
   height: 0;
   clear: both;
}

Or, if you don’t require IE<8 support, the following is fine too:

.clearfix:after {
  content: "";
  display: table;
  clear: both;
}

Read about it in this article – by Chris Coyer @ CSS-Tricks

The problem happens when a floated element is within a container box, that element does not automatically force the container’s height adjust to the floated element. When an element is floated, its parent no longer contains it because the float is removed from the flow. You can use 2 methods to fix it:

    {clear: both;}
    clearfix

Once you understand what is happening, use the method below to “clearfix” it.

.clearfix:after {	
    content: ".";	
    display: block;	
    clear: both;	
    isibility: hidden;	
    line-height: 0;	
    height: 0;
} 

.clearfix {	
    display: inline-block;
} 

html[xmlns] .clearfix {	
    display: block;
} 

* html .clearfix {	
    height: 1%;
}