GraphQL queries

To get back all collections and items in the collections, you can query like this:

query {
  collections {
    id 
    title
    items{
      id
      name
      price
    }
  }
}

To query back one collection with all the items, then you need to structure differently.

First you need to set a query variable:

{"id": "cjwuuj5bz000i0719rrtw5gqk"}

Then you update your query code like so (notice singular collection):

query($id: ID!) {
  collection(id: $id) {
    id 
    title
    items{
      id
      name
      price
    }
  }
}

TypeScript Basics

Add TypeScript to a component props that also has an change event handler:

import { ChangeEventHandler } from "react";
import "./search-box.styles.css";

type SearchBoxProps = {
  className: string;
  placeholder?: string;
  onChangeHandler: ChangeEventHandler<HTMLInputElement>;
};

const SearchBox = ({
  className,
  placeholder,
  onChangeHandler
}: SearchBoxProps) => (
  <input
    className={`search-box ${className}`}
    type="search"
    placeholder={placeholder}
    onChange={onChangeHandler}
  />
);

export default SearchBox;

You can pass on an array (Monster) from data fetching to setting the state on monsters and filteredMonsters. You’ll notice filteredMonsters inherits the array from monsters and doesn’t need to be defined again.

import { useState, useEffect, ChangeEvent } from 'react';

import CardList from './components/card-list/card-list.component.tsx';
import SearchBox from './components/search-box/search-box.component.tsx';

import { getData } from './utils/data.utils.ts';

import './App.css';

export type Monster = {
  id: string,
  name: string,
  email: string
}

const App = () => {
  const [searchField, setSearchField] = useState('');
  const [monsters, setMonsters] = useState<Monster[]>([]);
  const [filteredMonsters, setFilterMonsters] = useState(monsters);

  useEffect(() => {
    const fetchUsers = async () => {
      const users = await getData<Monster[]>('https://jsonplaceholder.typicode.com/users');
      setMonsters(users);
    }
    fetchUsers();
  }, []);

  useEffect(() => {
    const newFilteredMonsters = monsters.filter((monster) => {
      return monster.name.toLocaleLowerCase().includes(searchField);
    });

    setFilterMonsters(newFilteredMonsters);
  }, [monsters, searchField]);

  const onSearchChange = (event: ChangeEvent<HTMLInputElement>): void => {
    const searchFieldString = event.target.value.toLocaleLowerCase();
    setSearchField(searchFieldString);
  };

  return (
    <div className='App'>
      <h1 className='app-title'>Monsters Rolodex</h1>

      <SearchBox
        className='monsters-search-box'
        onChangeHandler={onSearchChange}
        placeholder='search monsters'
      />
      <CardList monsters={filteredMonsters} />
    </div>
  );
};

export default App;

Finally you can import the Monster array from a parent component to pass along as the props like this:

import { Monster } from '../../App.tsx';

import Card from '../card/card.component.tsx';
import './card-list.styles.css';

type CardListProps = {
  monsters: Monster[]
}

const CardList = ({ monsters }: CardListProps) => (
  <div className='card-list'>
    {monsters.map((monster) => {
      return <Card key={monster.id} monster={monster} />;
    })}
  </div>
);

export default CardList;

Redux Saga

Redux-Saga is a middleware library used to allow a Redux store to asynchronously interact with resources outside of itself. Redux-Saga helps in: making HTTP requests. accessing browser storage.

First install Redux Saga:

npm install redux-saga

Then update your store to include thunk to your middleware like so:

import { compose, createStore, applyMiddleware } from "redux";
import { persistStore, persistReducer } from "redux-persist";
import storage from "redux-persist/lib/storage";
import logger from "redux-logger";
import createSagaMiddleware from 'redux-saga';

import { rootSaga } from "./root-saga";

import { rootReducer } from "./root-reducer";

const persistConfig = {
  key: "root",
  storage,
  whitelist: ["cart"],
};

const sagaMiddleware = createSagaMiddleware();

const persistedReducer = persistReducer(persistConfig, rootReducer);

const middleWares = [
  process.env.NODE_ENV !== "production" && logger,
  sagaMiddleware
].filter(Boolean);

const composedEnhancer =
  (process.env.NODE_ENV !== "production" &&
    window &&
    window.__REDUX_DEVTOOLS_EXTENSION_COMPOSE__) ||
  compose;

const composedEnhancers = composedEnhancer(applyMiddleware(...middleWares));

export const store = createStore(
  persistedReducer,
  undefined,
  composedEnhancers
);

sagaMiddleware.run(rootSaga);

export const persistor = persistStore(store);

Note on Sagas and Generator functions

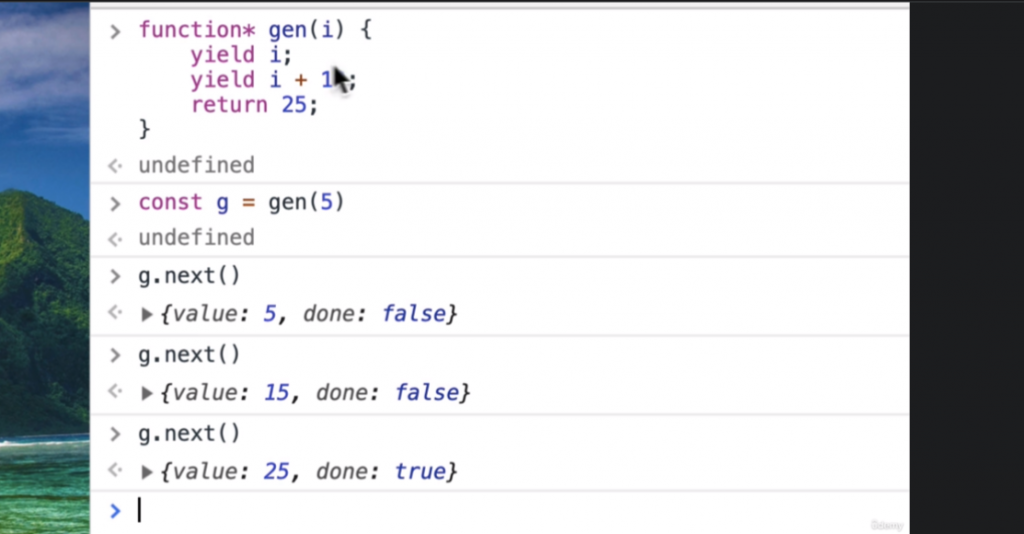
Sagas are implemented as Generator functions that yield objects to the redux-saga middleware. The yielded objects are a kind of instruction to be interpreted by the middleware. When a Promise is yielded to the middleware, the middleware will suspend the Saga until the Promise completes.

Here is an example of how a generator function works:

Create a file called category.saga.js and add your actions and asynchronous function:

import { takeLatest, call, put, all } from "redux-saga/effects";

import { getCategoriesAndDocuments } from "../../utils/firebase/firebase.utils";

import CATEGORIES_ACTION_TYPES from "./categories.types";

import {
  fetchCategoriesSuccess,
  fetchCategoriesFailed,
} from "./categories.action";

export function* fetchCategoriesAsync() {
  try {
    const categoriesArray = yield call(getCategoriesAndDocuments, "categories");
    yield put(fetchCategoriesSuccess(categoriesArray));
  } catch (error) {
    yield put(fetchCategoriesFailed(error));
  }
}

export function* onFetchCategories() {
  yield takeLatest(
    CATEGORIES_ACTION_TYPES.FETCH_CATEGORIES_START,
    fetchCategoriesAsync
  );
}

export function* categoriesSaga() {
  yield all([call(onFetchCategories)]);
}

Note: The function call is used to get back asynchronous code, while put replaces the dispatch function.

Create a root-saga.js file and add this code to it:

import {all, call} from 'redux-saga/effects';

import { categoriesSaga } from './categories/category.saga';

export function* rootSaga() {
    yield all([call(categoriesSaga)]);
}

Now you dispatch fetchCategoriesStart inside our component shop:

import { useEffect } from "react";
import { Routes, Route } from "react-router-dom";
import { useDispatch } from "react-redux";

import CategoriesPreview from "../categories-preview/categories-preview.component";
import Category from "../category/category.component";
import { fetchCategoriesStart } from "../../store/categories/categories.action";

const Shop = () => {
  const dispatch = useDispatch();

  useEffect(() => {
    dispatch(fetchCategoriesStart());
  }, []);
  return (
    <Routes>
      <Route index element={<CategoriesPreview />}></Route>
      <Route path=":category" element={<Category />}></Route>
    </Routes>
  );
};

export default Shop;

Redux Thunk

Thunk allows us to dispatch actions manually, which gives us the power to incorporate some logic or run some asynchronous code before dispatching an action.

First install Redux Thunk:

npm install redux-thunk

Then update your store to include thunk to your middleware like so:

import thunk from "redux-thunk";

const middleWares = [
  process.env.NODE_ENV !== "production" && logger,
  thunk,
].filter(Boolean);

If you have any logic or asynchronous code you are running in your component that you run before you dispatch , now you can add those to your action files instead. First you’ll need to modify your reducer with new action types to handle these states.

Open up your reducer file and add:

import CATEGORIES_ACTION_TYPES from "./categories.types";

export const CATEGORIES_INITIAL_STATE = {
  categories: [],
  isLoading: false,
  error: null,
};

export const categoriesReducer = (
  state = CATEGORIES_INITIAL_STATE,
  action = {}
) => {
  const { type, payload } = action;

  switch (type) {
    case CATEGORIES_ACTION_TYPES.FETCH_CATEGORIES_START:
      return { ...state, isLoading: true };
    case CATEGORIES_ACTION_TYPES.FETCH_CATEGORIES_SUCCESS:
      return { ...state, categories: payload, isLoading: false };
    case CATEGORIES_ACTION_TYPES.FETCH_CATEGORIES_FAILED:
      return { ...state, error: payload, isLoading: false };
    default:
      return state;
  }
};

Earlier we only had one action type which was GET_CATEGORIES. We now can have three different actions: START, SUCCESS and FAILED. This is because we will now have asynchronous code inside our actions file which will allow us to know the order of our actions.

Update our actions file:

import CATEGORIES_ACTION_TYPES from "./categories.types";
import { createAction } from "../../utils/reducer/reducer.utils";
import { getCategoriesAndDocuments } from "../../utils/firebase/firebase.utils";

export const fetchCategoriesStart = () =>
  createAction(CATEGORIES_ACTION_TYPES.FETCH_CATEGORIES_START);

export const fetchCategoriesSuccess = (categoriesArray) =>
  createAction(
    CATEGORIES_ACTION_TYPES.FETCH_CATEGORIES_SUCCESS,
    categoriesArray
  );

export const fetchCategoriesFailed = (error) =>
  createAction(CATEGORIES_ACTION_TYPES.FETCH_CATEGORIES_FAILED, error);

export const fetchCategoriesAsync = () => async (dispatch) => {
  dispatch(fetchCategoriesStart());

  try {
    const categoriesArray = await getCategoriesAndDocuments("categories");
    dispatch(fetchCategoriesSuccess(categoriesArray));
  } catch (error) {
    dispatch(fetchCategoriesFailed(error));
  }
};

The functions fetchCategoriesStart, fetchCategoriesSuccess, fetchCategoriesFailed are like earlier actions without thunk installed. It was also why we could only have one action. The new function that has the logic and asynchronous code is called fetchCategoriesAsync (Thunk recommends to include the word Async in the name so we know that this function is in fact asynchronous). This new function includes all our actions (start, success and failed) depending on what’s pulled back from the data source.

Now you only need to dispatch fetchCategoriesAsync inside our component shop:

import { useEffect } from "react";
import { Routes, Route } from "react-router-dom";
import { useDispatch } from "react-redux";

import CategoriesPreview from "../categories-preview/categories-preview.component";
import Category from "../category/category.component";
import { fetchCategoriesAsync } from "../../store/categories/categories.action";

const Shop = () => {
  const dispatch = useDispatch();

  useEffect(() => {
    dispatch(fetchCategoriesAsync());
  }, []);
  return (
    <Routes>
      <Route index element={<CategoriesPreview />}></Route>
      <Route path=":category" element={<Category />}></Route>
    </Routes>
  );
};

export default Shop;

And finally you can update your GUI with a loading spinner when we are waiting for data inside the Category component:

import { useState, useEffect, Fragment } from "react";
import { useSelector } from "react-redux";
import { useParams } from "react-router-dom";

import ProductCard from "../../components/product-card/product-card.component";
import Spinner from "../../components/spinner/spinner.component";

import {
  selectCategoriesIsLoading,
  selectCategoriesMap,
} from "../../store/categories/categories.selector";

import { CategoryContainer, Title } from "./category.styles";

const Category = () => {
  const { category } = useParams();
  const categoriesMap = useSelector(selectCategoriesMap);
  const isLoading = useSelector(selectCategoriesIsLoading);
  const [products, setProducts] = useState(categoriesMap[category]);

  useEffect(() => {
    setProducts(categoriesMap[category]);
  }, [category, categoriesMap]);

  return (
    <Fragment>
      <Title>{category.toUpperCase()}</Title>
      {isLoading ? (
        <Spinner />
      ) : (
        <CategoryContainer>
          {products &&
            products.map((product) => (
              <ProductCard key={product.id} product={product} />
            ))}
        </CategoryContainer>
      )}
    </Fragment>
  );
};

export default Category;

Set up Redux Devtools

Redux Devtools is a Chrome extension which you need to install first.

Then update your composer in your store to use Redux Devtools when not in the production environment and only when a window object exists (so it doesn’t break when building).

The original composer looks like this:

const composedEnhancers = compose(applyMiddleware(...middleWares));

Update this composer to choose between the original and Redux Devtools depending on the environment:

const composedEnhancer =
  (process.env.NODE_ENV !== "production" &&
    window &&
    window.__REDUX_DEVTOOLS_EXTENSION_COMPOSE__) ||
  compose;

const composedEnhancers = composedEnhancer(applyMiddleware(...middleWares));

Now when you view your redux site in Chrome the Devtools extension will be highlighted and you can view all the live states and even do a playback of all the states. Very useful for debugging complex applications.

Redux Logger

Install redux-logger:

npm install redux-logger

Then add this logger to your store. Note the extra code so the logger only runs in development mode:

import { compose, createStore, applyMiddleware } from "redux";
import logger from "redux-logger";

import { rootReducer } from "./root-reducer";

const middleWares = [process.env.NODE_ENV !=='production' && logger].filter(Boolean);

const composedEnhancers = compose(applyMiddleware(...middleWares));

export const store = createStore(rootReducer, undefined, composedEnhancers);

Redux Persist

This library passes the redux store to localStorage.

First install redux persist library to your project:

npm install redux-persist

Then set up redux-persist in your store like so:

import { compose, createStore, applyMiddleware } from "redux";
import { persistStore, persistReducer } from "redux-persist";
import storage from "redux-persist/lib/storage";
import logger from "redux-logger";

const persistConfig = {
  key: "root",
  storage,
  blacklist: ["user"],
};

const persistedReducer = persistReducer(persistConfig, rootReducer);

const middleWares = [logger];

const composedEnhancers = compose(applyMiddleware(...middleWares));

export const store = createStore(
  persistedReducer,
  undefined,
  composedEnhancers
);

export const persistor = persistStore(store);

The above excludes adding the user reducer to persist (blacklist: ["user"]) because its already being added to the cache.

Now you need to edit your main index.js file to add the PersistGate with the new persist config attached like so:

import React from "react";
import ReactDOM from "react-dom/client";
import { BrowserRouter } from "react-router-dom";
import { Provider } from "react-redux";
import { PersistGate } from "redux-persist/es/integration/react";

import App from "./App";
import { store, persistor } from "./store/store";

import "./index.scss";

const root = ReactDOM.createRoot(document.getElementById("root"));
root.render(
  <React.StrictMode>
    <Provider store={store}>
      <PersistGate loading={null} persistor={persistor}>
        <BrowserRouter>
          <App />
        </BrowserRouter>
      </PersistGate>
    </Provider>
  </React.StrictMode>
);

Now when you refresh your browser you’ll see all the store reducers maintain their state.

Creating Custom Middleware

The below will give more detailed view of when code runs:

import { compose, createStore, applyMiddleware } from "redux";
// import logger from "redux-logger";

import { rootReducer } from "./root-reducer";

const loggerMiddleware = (store) => (next) => (action) => {
  if (!action.type) {
    return next(action);
  }
  console.log("type: ", action.type);
  console.log("payload: ", action.payload);
  console.log("currentState: ", store.getState());

  next(action);

  console.log('next state: ', store.getState());
};

const middleWares = [process.env.NODE_ENV !=='production' && loggerMiddleware].filter(Boolean);

const composedEnhancers = compose(applyMiddleware(...middleWares));

export const store = createStore(rootReducer, undefined, composedEnhancers);

The bit of code [process.env.NODE_ENV !=='production' && loggerMiddleware].filter(Boolean) makes sure this logger only runs in development mode.

Currying a Function

Currying a function is essentially a function that returns back another function. The reason you do this is maybe function “curryFunc” receives some variable “a”. What happens is the return function might use “a” inside of it. But what it does is it depends on two additional properties that you add to it as new parameters for this function.

const curryFunc = (a) => (b, c) => {
a + b - c
}

const with3 = curryFunc(3);
const with10 = curryFunc(3);

with3(2, 4); // 3 + 2 - 4
with10(9, 2); // 3 + 9 - 2

The above example shows how you can create functions from a function (reusable functions).

This type of logic is very helpful when creating our own custom middleware functions for Redux.

React Redux Login Authentication

Part 1

Create a bootstrap project:

Create a new view under new components folder called master.blade.php. This HTML template taken from Bootstrap:

<!doctype html>
<html lang="en">
  <head>
    <meta charset="utf-8">
    <meta name="viewport" content="width=device-width, initial-scale=1, shrink-to-fit=no">
    <meta name="description" content="">
    <meta name="author" content="">
    <link rel="icon" href="https://getbootstrap.com/docs/4.0/assets/img/favicons/favicon.ico">

    <title>Blog Template for Bootstrap</title>

    <link rel="canonical" href="https://getbootstrap.com/docs/4.0/examples/blog/">

    <!-- Bootstrap core CSS -->
    <link href="https://getbootstrap.com/docs/4.0/dist/css/bootstrap.min.css" rel="stylesheet">

    <!-- Custom styles for this template -->
    <link href="https://fonts.googleapis.com/css?family=Playfair+Display:700,900" rel="stylesheet">
    <link href="{{asset('css/app.css')}}" rel="stylesheet">
    <link href="{{asset('css/blog.css')}}" rel="stylesheet">
  </head>

  <body>

    <div class="container">
      <header class="blog-header py-3">
        <div class="row flex-nowrap justify-content-between align-items-center">
          <div class="col-4 pt-1">
            <a class="text-muted" href="#">Subscribe</a>
          </div>
          <div class="col-4 text-center">
            <a class="blog-header-logo text-dark" href="#">Large</a>
          </div>
          <div class="col-4 d-flex justify-content-end align-items-center">
            <a class="text-muted" href="#">
              <svg xmlns="http://www.w3.org/2000/svg" width="20" height="20" viewBox="0 0 24 24" fill="none" stroke="currentColor" stroke-width="2" stroke-linecap="round" stroke-linejoin="round" class="mx-3"><circle cx="10.5" cy="10.5" r="7.5"></circle><line x1="21" y1="21" x2="15.8" y2="15.8"></line></svg>
            </a>
            <a class="btn btn-sm btn-outline-secondary" href="#">Sign up</a>
          </div>
        </div>
      </header>

      <div class="nav-scroller py-1 mb-2">
        <nav class="nav d-flex justify-content-between">
          <a class="p-2 text-muted" href="#">World</a>
          <a class="p-2 text-muted" href="#">U.S.</a>
          <a class="p-2 text-muted" href="#">Technology</a>
          <a class="p-2 text-muted" href="#">Design</a>
          <a class="p-2 text-muted" href="#">Culture</a>
          <a class="p-2 text-muted" href="#">Business</a>
          <a class="p-2 text-muted" href="#">Politics</a>
          <a class="p-2 text-muted" href="#">Opinion</a>
          <a class="p-2 text-muted" href="#">Science</a>
          <a class="p-2 text-muted" href="#">Health</a>
          <a class="p-2 text-muted" href="#">Style</a>
          <a class="p-2 text-muted" href="#">Travel</a>
        </nav>
      </div>

      <div class="jumbotron p-3 p-md-5 text-white rounded bg-dark">
        <div class="col-md-6 px-0">
          <h1 class="display-4 font-italic">Title of a longer featured blog post</h1>
          <p class="lead my-3">Multiple lines of text that form the lede, informing new readers quickly and efficiently about what's most interesting in this post's contents.</p>
          <p class="lead mb-0"><a href="#" class="text-white font-weight-bold">Continue reading...</a></p>
        </div>
      </div>
    </div>

    <main role="main" class="container">
      <div class="row">
        <div class="col-md-8 blog-main">
          <h3 class="pb-3 mb-4 font-italic border-bottom">
            From the Firehose
          </h3>

          <div class="blog-post">
            <h2 class="blog-post-title">Sample blog post</h2>
            <p class="blog-post-meta">January 1, 2014 by <a href="#">Mark</a></p>

            <p>This blog post shows a few different types of content that's supported and styled with Bootstrap. Basic typography, images, and code are all supported.</p>
            <hr>
            <p>Cum sociis natoque penatibus et magnis <a href="#">dis parturient montes</a>, nascetur ridiculus mus. Aenean eu leo quam. Pellentesque ornare sem lacinia quam venenatis vestibulum. Sed posuere consectetur est at lobortis. Cras mattis consectetur purus sit amet fermentum.</p>
            <blockquote>
              <p>Curabitur blandit tempus porttitor. <strong>Nullam quis risus eget urna mollis</strong> ornare vel eu leo. Nullam id dolor id nibh ultricies vehicula ut id elit.</p>
            </blockquote>
            <p>Etiam porta <em>sem malesuada magna</em> mollis euismod. Cras mattis consectetur purus sit amet fermentum. Aenean lacinia bibendum nulla sed consectetur.</p>
            <h2>Heading</h2>
            <p>Vivamus sagittis lacus vel augue laoreet rutrum faucibus dolor auctor. Duis mollis, est non commodo luctus, nisi erat porttitor ligula, eget lacinia odio sem nec elit. Morbi leo risus, porta ac consectetur ac, vestibulum at eros.</p>
            <h3>Sub-heading</h3>
            <p>Cum sociis natoque penatibus et magnis dis parturient montes, nascetur ridiculus mus.</p>
            <pre><code>Example code block</code></pre>
            <p>Aenean lacinia bibendum nulla sed consectetur. Etiam porta sem malesuada magna mollis euismod. Fusce dapibus, tellus ac cursus commodo, tortor mauris condimentum nibh, ut fermentum massa.</p>
            <h3>Sub-heading</h3>
            <p>Cum sociis natoque penatibus et magnis dis parturient montes, nascetur ridiculus mus. Aenean lacinia bibendum nulla sed consectetur. Etiam porta sem malesuada magna mollis euismod. Fusce dapibus, tellus ac cursus commodo, tortor mauris condimentum nibh, ut fermentum massa justo sit amet risus.</p>
            <ul>
              <li>Praesent commodo cursus magna, vel scelerisque nisl consectetur et.</li>
              <li>Donec id elit non mi porta gravida at eget metus.</li>
              <li>Nulla vitae elit libero, a pharetra augue.</li>
            </ul>
            <p>Donec ullamcorper nulla non metus auctor fringilla. Nulla vitae elit libero, a pharetra augue.</p>
            <ol>
              <li>Vestibulum id ligula porta felis euismod semper.</li>
              <li>Cum sociis natoque penatibus et magnis dis parturient montes, nascetur ridiculus mus.</li>
              <li>Maecenas sed diam eget risus varius blandit sit amet non magna.</li>
            </ol>
            <p>Cras mattis consectetur purus sit amet fermentum. Sed posuere consectetur est at lobortis.</p>
          </div><!-- /.blog-post -->

          <div class="blog-post">
            <h2 class="blog-post-title">Another blog post</h2>
            <p class="blog-post-meta">December 23, 2013 by <a href="#">Jacob</a></p>

            <p>Cum sociis natoque penatibus et magnis <a href="#">dis parturient montes</a>, nascetur ridiculus mus. Aenean eu leo quam. Pellentesque ornare sem lacinia quam venenatis vestibulum. Sed posuere consectetur est at lobortis. Cras mattis consectetur purus sit amet fermentum.</p>
            <blockquote>
              <p>Curabitur blandit tempus porttitor. <strong>Nullam quis risus eget urna mollis</strong> ornare vel eu leo. Nullam id dolor id nibh ultricies vehicula ut id elit.</p>
            </blockquote>
            <p>Etiam porta <em>sem malesuada magna</em> mollis euismod. Cras mattis consectetur purus sit amet fermentum. Aenean lacinia bibendum nulla sed consectetur.</p>
            <p>Vivamus sagittis lacus vel augue laoreet rutrum faucibus dolor auctor. Duis mollis, est non commodo luctus, nisi erat porttitor ligula, eget lacinia odio sem nec elit. Morbi leo risus, porta ac consectetur ac, vestibulum at eros.</p>
          </div><!-- /.blog-post -->

          <div class="blog-post">
            <h2 class="blog-post-title">New feature</h2>
            <p class="blog-post-meta">December 14, 2013 by <a href="#">Chris</a></p>

            <p>Cum sociis natoque penatibus et magnis dis parturient montes, nascetur ridiculus mus. Aenean lacinia bibendum nulla sed consectetur. Etiam porta sem malesuada magna mollis euismod. Fusce dapibus, tellus ac cursus commodo, tortor mauris condimentum nibh, ut fermentum massa justo sit amet risus.</p>
            <ul>
              <li>Praesent commodo cursus magna, vel scelerisque nisl consectetur et.</li>
              <li>Donec id elit non mi porta gravida at eget metus.</li>
              <li>Nulla vitae elit libero, a pharetra augue.</li>
            </ul>
            <p>Etiam porta <em>sem malesuada magna</em> mollis euismod. Cras mattis consectetur purus sit amet fermentum. Aenean lacinia bibendum nulla sed consectetur.</p>
            <p>Donec ullamcorper nulla non metus auctor fringilla. Nulla vitae elit libero, a pharetra augue.</p>
          </div><!-- /.blog-post -->

          <nav class="blog-pagination">
            <a class="btn btn-outline-primary" href="#">Older</a>
            <a class="btn btn-outline-secondary disabled" href="#">Newer</a>
          </nav>

        </div><!-- /.blog-main -->

        <aside class="col-md-4 blog-sidebar">
          <div class="p-3 mb-3 bg-light rounded">
            <h4 class="font-italic">About</h4>
            <p class="mb-0">Etiam porta <em>sem malesuada magna</em> mollis euismod. Cras mattis consectetur purus sit amet fermentum. Aenean lacinia bibendum nulla sed consectetur.</p>
          </div>

          <div class="p-3">
            <h4 class="font-italic">Archives</h4>
            <ol class="list-unstyled mb-0">
              <li><a href="#">March 2014</a></li>
              <li><a href="#">February 2014</a></li>
              <li><a href="#">January 2014</a></li>
              <li><a href="#">December 2013</a></li>
              <li><a href="#">November 2013</a></li>
              <li><a href="#">October 2013</a></li>
              <li><a href="#">September 2013</a></li>
              <li><a href="#">August 2013</a></li>
              <li><a href="#">July 2013</a></li>
              <li><a href="#">June 2013</a></li>
              <li><a href="#">May 2013</a></li>
              <li><a href="#">April 2013</a></li>
            </ol>
          </div>

          <div class="p-3">
            <h4 class="font-italic">Elsewhere</h4>
            <ol class="list-unstyled">
              <li><a href="#">GitHub</a></li>
              <li><a href="#">Twitter</a></li>
              <li><a href="#">Facebook</a></li>
            </ol>
          </div>
        </aside><!-- /.blog-sidebar -->

      </div><!-- /.row -->

    </main><!-- /.container -->

    <footer class="blog-footer">
      <p>Blog template built for <a href="https://getbootstrap.com/">Bootstrap</a> by <a href="https://twitter.com/mdo">@mdo</a>.</p>
      <p>
        <a href="#">Back to top</a>
      </p>
    </footer>

    <!-- Bootstrap core JavaScript
    ================================================== -->
    <!-- Placed at the end of the document so the pages load faster -->
    <script src="https://code.jquery.com/jquery-3.2.1.slim.min.js" integrity="sha384-KJ3o2DKtIkvYIK3UENzmM7KCkRr/rE9/Qpg6aAZGJwFDMVNA/GpGFF93hXpG5KkN" crossorigin="anonymous"></script>
    <script>window.jQuery || document.write('<script src="../../assets/js/vendor/jquery-slim.min.js"><\/script>')</script>
    <script src="../../assets/js/vendor/popper.min.js"></script>
    <script src="../../dist/js/bootstrap.min.js"></script>
    <script src="../../assets/js/vendor/holder.min.js"></script>
    <script>
      Holder.addTheme('thumb', {
        bg: '#55595c',
        fg: '#eceeef',
        text: 'Thumbnail'
      });
    </script>
  </body>
</html>

In the welcome view replace with a component like this:

<x-master>
</x-master>

Part 2

Cut everything inside blog-main class of master.blade.php and add inside these tags of welcome.blade.php

<x-master>
    @section('main-content')
    Code here
    @endsection
</x-master>

Between blog-main class will now look like:

        <div class="col-md-8 blog-main">
          @yield('main-content')
        </div>

You can further make the main content contain another component by creating a new component called <x-test></x-test> inside the new section. Then in components folder create a template called test.blade.php and add the content you want.

Part 3

Pass data to components

Open routes to add proper controller to the route:

Route::get('/', [App\Http\Controllers\HomeController::class, 'index']);

In home.blade.php add this:

<x-test :users="$users"></x-test>

In your test.blade.php add this:

@foreach($users as $user)
    {{$user->name}}
@endforeach

And finally add this to the HomeController.php

use App\Models\User;
    public function index()
    {
        $users = User::all();
        return view('home', ['users' => $users]);
        
    }