Undo Last Git Commit with reset

The easiest way to undo the last Git commit is to execute the “git reset” command with the “–soft” option that will preserve changes done to your files. You have to specify the commit to undo which is “HEAD~1” in this case.

The last commit will be removed from your Git history.

git reset --soft HEAD~1

In order to undo the last commit and discard all changes in the working directory and index, execute the “git reset” command with the “–hard” option and specify the commit before HEAD (“HEAD~1”).

git reset --hard HEAD~1

How to load SSH Keys to SourceTree

A lot of articles will mention loading the SSK key through the SourceTree app… don’t do this.

SourceTree will look in Pageant Key List. To load it here type “Pageant” in Windows search. Open the program. Find the ppk key to load (will need to be version 2). Then you’ll be able to push to GitHub and Bitbucket.

Move repository from Bitbucket to GitHub with all branches and commits

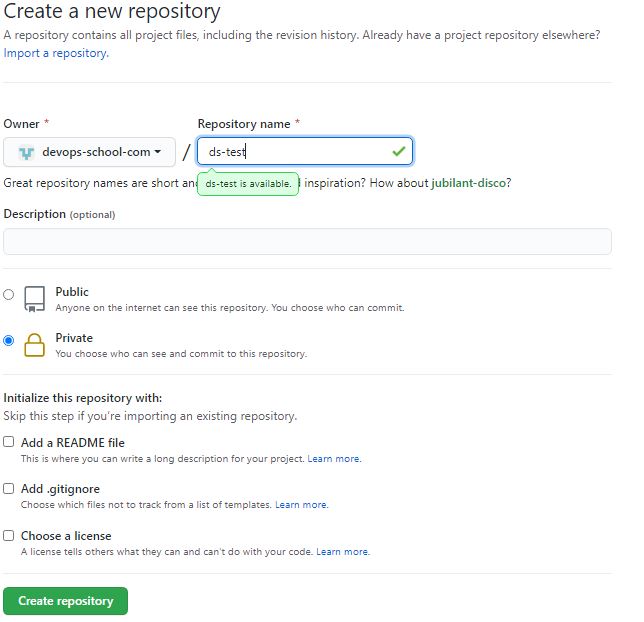
Step 1 : Create a Blank repository on Github without Readme.md

Step 2 : Moving all code and content from bitbucket

1. Check out the existing repository from Bitbucket:

$ git clone git@bitbucket.org:Cotocuschandan/testrepo.git

2. Now adding new GitHub Repository as upstream remote of the repository which is clone from bitbucket.

$ cd testrepo
$ git remote add upstream git@github.com:devops-school-com/ds-test.git

3. push all branches and tags to GitHub Repository using below commands

$ git push upstream master
$ git push --tags upstream

Step 3 : Add URL of New Github Repository as redirect URL

$ git remote set-url origin git@github.com:devops-school-com/ds-test.git

Step 4: At last Clone all branches and tags to GitHub Repository

$ git push --mirror

Edit old commit message

Filter Branch Command Line Method

Add this piece of code to Git Bash for project but update the commit ID and the commit message:

git filter-branch --msg-filter "test $(echo '$GIT_COMMIT') = $(git rev-parse 05163c9b8ba425369c9b1619d43ed17b16604ec3) && echo 'Adding theme files' || cat" -- --all

Force push the commit to Github.com with this:

git push origin master --force

Filter Branch Bash Method

Issue: Can’t read PATH

Add this to file named git-reword-commit inside C:\bin

#! /bin/bash
path_to_git='/c/Program Files/Git/mingw64/bin/'
PATH=$PATH:$path_to_git
echo $PATH
export PATH
REV=$1
MESSAGE=$2
FILTER="test $(echo '$GIT_COMMIT') = $(git rev-parse $REV) && echo $MESSAGE || cat"
git filter-branch --msg-filter "$FILTER" -- --all

Open cmd and go to directory C:\bin then type

bash git-reword-commit

PATH is supposed to make the git command work but get these errors:

': not a valid identifier: export: `PATH
git-reword-commit: line 7: git: command not found
git-reword-commit: line 8: git: command not found

Rebase Method

Issue: Only changes on one branch… if the change happened on Master you’ll only see on Master and not Develop. It also separates the two branches and they no longer intertwine.

Figure out how many commits to go back. If you get an error message you went back too far:

git rebase -i HEAD~133

If you didn’t go far back enough then undo it

git rebase --abort

When you see your commit, use the up and down keys to get to the line. Press “i” to enable editing of text. Change “pick” to “reword” and press “Esc” then type “:wq” which will save the file.

pick e499d89 Corrected syntax error 
pick 0c39034 Adding code prism.js
pick f7fde4a More css updates

# Rebase 9fdb3bd..f7fde4a onto 9fdb3bd
#
# Commands:
# p, pick = use commit
# r, reword = use commit, but edit the commit message
# e, edit = use commit, but stop for amending
# s, squash = use commit, but meld into previous commit
# f, fixup = like "squash", but discard this commit's log message
# x, exec = run command (the rest of the line) using shell
#
# These lines can be re-ordered; they are executed from top to bottom.
#
# If you remove a line here THAT COMMIT WILL BE LOST.
#
# However, if you remove everything, the rebase will be aborted.
#
# Note that empty commits are commented out

After I saved and closed, it then opened up the commit I renamed and I saved that with “:wq” as well.

Finish the rebase with:

git rebase --continue

Force push the commit to Github.com with this:

git push origin master --force

Set up new project on HQ Deploy

https://christine.deployhq.com/projects/new

  1. Choose Bitbucket and create project
  2. Choose your new repo you created
  3. Create Production Server
  4. Hostname:
    35.192.41.230
  5. Username:
    chris
  6. Check off ” Use SSH key rather than password for authentication? “
  7. Copy key, open Filezilla login with chris
  8. Go to .ssh/authorized_keys and copy file to desktop
  9. Open file and add new key. Upload back to server
  10. On FileZilla open theme folder in site and copy full path. Add to “Deployment Path”
  11. Click “Create Server”

You can now deploy master branch to website

Set Up an SSH Key for SourceTree (Windows)

Purpose

When you set up SSH, you create a key pair that contains a private key (saved to your local computer) and a public key (uploaded to Bitbucket). Bitbucket uses the key pair to authenticate anything the associated account can access. This two-way mechanism prevents man-in-the-middle attacks.

This first key pair is your default SSH identity. If you need more than a default identity, you can set up additional keys.

For security reasons, we recommend that you generate a new SSH key and replace the existing key on your account at least once a year.

You can’t use the same key between accounts. You must create new keys for each individual Bitbucket account.

Set up SSH for Git on Windows

Use this section to create a default identity and SSH key when you’re using Git on Windows. By default, the system adds keys for all identities to the /Users/<username>/.ssh directory.Collapse

Step 1. Set up your default identity

  1. From the command line, enter ssh-keygen.For Windows 7 or earlierYou can only enter ssh-keygen into the Git Bash window. It won’t work in the Command prompt.The command prompts you for a file to save the key in:$ ssh-keygen
    Generating public/private rsa key pair.
    Enter file in which to save the key (/c/Users/emmap1/.ssh/id_rsa):
  2. Press enter to accept the default key and path, /c/Users/<username>/.ssh/id_rsa.We recommend you keep the default key name unless you have a reason to change it.To create a key with a name or path other than the default, specify the full path to the key. For example, to create a key called my-new-ssh-key, you would enter the Windows path, shown here:$ ssh-keygen
    Generating public/private rsa key pair.
    Enter file in which to save the key (/c/Users/emmap1/.ssh/id_rsa): c:\Users\emmap1\.ssh\my-new-ssh-key
  3. Enter and re-enter a passphrase when prompted.The command creates your default identity with its public and private keys. The whole interaction looks similar to this:$ ssh-keygen
    Generating public/private rsa key pair.
    Enter file in which to save the key (/c/Users/emmap1/.ssh/id_rsa):
    Created directory '/c/Users/emmap1/.ssh'.
    Enter passphrase (empty for no passphrase):
    Enter same passphrase again:
    Your identification has been saved in /c/Users/emmap1/.ssh/id_rsa.
    Your public key has been saved in /c/Users/emmap1/.ssh/id_rsa.pub.
    The key fingerprint is: e7:94:d1:a3:02:ee:38:6e:a4:5e:26:a3:a9:f4:95:d4 emmap1@EMMA-PC
  4. List the contents of .ssh to view the key files.You should see something like the following:$ dir .ssh
    id_rsa id_rsa.pub
    The command displays two files, one for the public key (for example id_rsa.pub) and one for the private key (for example, id_rsa).

Step 2. Add the key to the ssh-agent

If you don’t want to type your password each time you use the key, you’ll need to add it to the ssh-agent.

  1. To start the agent, run the following:$ eval $(ssh-agent)
    Agent pid 9700
  2. Enter ssh-add followed by the path to the private key file:$ ssh-add ~/.ssh/<private_key_file>

Step 3. Add the public key to your Bitbucket settings

  1. From Bitbucket, choose Bitbucket settings from your avatar in the lower left.
    The Account settings page opens.
  2. Click SSH keys.
    If you’ve already added keys, you’ll see them on this page.
  3. Open your .ssh/id_rsa.pub file (or whatever you named the public key file) and copy its contents.
    You may see an email address on the last line. It doesn’t matter whether or not you include the email address.
  4. From Bitbucket, click Add key.
  5. Enter a Label for your new key, for example, Default public key.
  6. Paste the copied public key into the SSH Key field.
  7. Click Save.
    Bitbucket sends you an email to confirm the addition of the key.Edit an SSH keyAfter you add a key, you can edit the key’s Label but not the key itself. To change the key’s contents, you need to delete and re-add the key.
  8. Return to the command line and verify your configuration and username by entering the following command:$ ssh -T git@bitbucket.orgThe command message tells you which of your Bitbucket accounts can log in with that key.conq: logged in as emmap1. You can use git or hg to connect to Bitbucket. Shell access is disabled.If you get an error message with Permission denied (publickey), check the Troubleshoot SSH issues page for help.
  9. Open SourceTree and go to Tools > Options. In General tab find “SSH Client Configuration”. Find the path to your private SSH key. For SSH Client choose “OpenSSH”

Now that you’ve got an SSH key set up, use the SSH URL the next time you clone a repository. If you already have a repository that you cloned over HTTPS, change the remote URL for your repository to its SSH URL.

Error: git master matches more than one

Sometimes a tag will be on origin which has the same name as the branch. Windows in particular has an issue with this and will give you an error (git master matches more than one). You can delete the origin tag with the following code, then you’ll be able to push code to your master branch again using SourceTree

git push origin :refs/tags/master

If all else fails.. push in console mode using this line

 git push origin refs/heads/master