Sort Multidimensional Array by Value

$list = Array
(
    [0] => Array
        (
            [lat] => '43.65529'
            [lng] => '-79.38397'
            [name] => 'Name'
        )
    [1] => Array
        (
            [lat] => '43.65328'
            [lng] => '-79.37947'
            [name] => 'Name'
        )
    [2] => Array
        (
            [lat] => '43.65516'
            [lng] => '-79.38892'
            [name] => 'Name'
        )
)

Sort with latitude going smallest to largest with longitude also going smallest to largest after

array_multisort(
	array_column($list, 'lat'), SORT_ASC, 
	array_column($list, 'lng'), SORT_ASC,
	$row
);

Array now looks like this

Array
(
    [0] => Array
        (
            [lat] => '43.65328'
            [lng] => '-79.37947'
            [name] => 'Name'
        )
    [1] => Array
        (
            [lat] => '43.65516'
            [lng] => '-79.38892'
            [name] => 'Name'
        )
    [2] => Array
        (
            [lat] => '43.65529'
            [lng] => '-79.38397'
            [name] => 'Name'
        )
)

How to load SSH Keys to SourceTree

A lot of articles will mention loading the SSK key through the SourceTree app… don’t do this.

SourceTree will look in Pageant Key List. To load it here type “Pageant” in Windows search. Open the program. Find the ppk key to load (will need to be version 2). Then you’ll be able to push to GitHub and Bitbucket.

Couldn’t load private key format too new

This issue happens when you use PuTTYgen to generate or convert to a ppk key.

When you use PuTTYgen to generate or convert to a ppk key and leave PuTTYgen settings as default, you might experience this issue.

From PuTTY version 0.75, the program uses a new format to generate the SSH private key; it uses ppk version 3. However, PuTTY 0.74 or earlier versions can’t read this format, and this can be a problem for programs that use PuTTY internally, like Solar PuTTY or MobaXtermn. If the internal PuTTY version is not compatible with PPK version 3, the program can’t use keys created with a default setting of PuTTY 0.75.

Solution

You can generate a new SSH key pair or change the private key format of an existing private key using PuTTYgen .

Step 1: Change the PuTTYgen PPK File Version to version 2.

Run the PuTTYgen program. Go to Key > Parameters for saving key files…

Changing the Version of the SSH Private Key

Change the PuTTygen PPK File Version to version 2.

Changing the Version of the SSH Private Key

Step 2: Generate a new SSH key pair or change the format of an existing one.

After following step one, you can now generate a key using the ppk version 2. You will be able to SSH to the cloud instance. This option is better if you are just creating the cloud instance. 

Step 3: Click on Load and search for your ppk key (version 3). Click Save private key, to convert the key to the old ppk format.

Changing the Version of the SSH Private Key

Move repository from Bitbucket to GitHub with all branches and commits

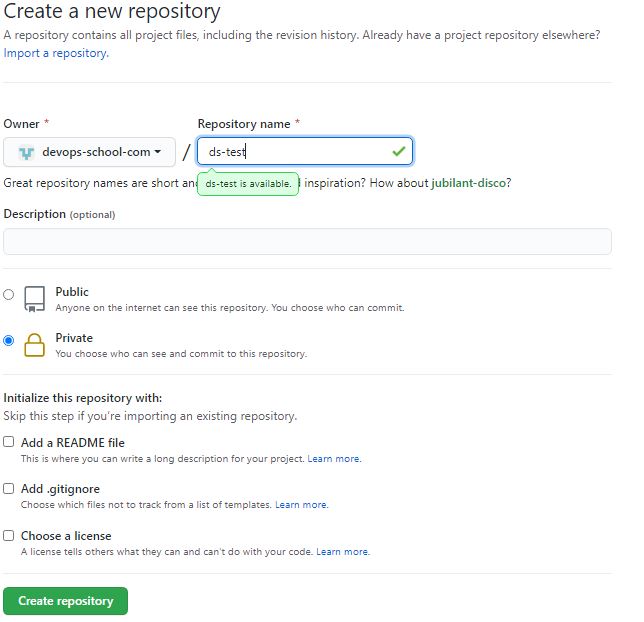
Step 1 : Create a Blank repository on Github without Readme.md

Step 2 : Moving all code and content from bitbucket

1. Check out the existing repository from Bitbucket:

$ git clone git@bitbucket.org:Cotocuschandan/testrepo.git

2. Now adding new GitHub Repository as upstream remote of the repository which is clone from bitbucket.

$ cd testrepo
$ git remote add upstream git@github.com:devops-school-com/ds-test.git

3. push all branches and tags to GitHub Repository using below commands

$ git push upstream master
$ git push --tags upstream

Step 3 : Add URL of New Github Repository as redirect URL

$ git remote set-url origin git@github.com:devops-school-com/ds-test.git

Step 4: At last Clone all branches and tags to GitHub Repository

$ git push --mirror

Edit old commit message

Filter Branch Command Line Method

Add this piece of code to Git Bash for project but update the commit ID and the commit message:

git filter-branch --msg-filter "test $(echo '$GIT_COMMIT') = $(git rev-parse 05163c9b8ba425369c9b1619d43ed17b16604ec3) && echo 'Adding theme files' || cat" -- --all

Force push the commit to Github.com with this:

git push origin master --force

Filter Branch Bash Method

Issue: Can’t read PATH

Add this to file named git-reword-commit inside C:\bin

#! /bin/bash
path_to_git='/c/Program Files/Git/mingw64/bin/'
PATH=$PATH:$path_to_git
echo $PATH
export PATH
REV=$1
MESSAGE=$2
FILTER="test $(echo '$GIT_COMMIT') = $(git rev-parse $REV) && echo $MESSAGE || cat"
git filter-branch --msg-filter "$FILTER" -- --all

Open cmd and go to directory C:\bin then type

bash git-reword-commit

PATH is supposed to make the git command work but get these errors:

': not a valid identifier: export: `PATH
git-reword-commit: line 7: git: command not found
git-reword-commit: line 8: git: command not found

Rebase Method

Issue: Only changes on one branch… if the change happened on Master you’ll only see on Master and not Develop. It also separates the two branches and they no longer intertwine.

Figure out how many commits to go back. If you get an error message you went back too far:

git rebase -i HEAD~133

If you didn’t go far back enough then undo it

git rebase --abort

When you see your commit, use the up and down keys to get to the line. Press “i” to enable editing of text. Change “pick” to “reword” and press “Esc” then type “:wq” which will save the file.

pick e499d89 Corrected syntax error 
pick 0c39034 Adding code prism.js
pick f7fde4a More css updates

# Rebase 9fdb3bd..f7fde4a onto 9fdb3bd
#
# Commands:
# p, pick = use commit
# r, reword = use commit, but edit the commit message
# e, edit = use commit, but stop for amending
# s, squash = use commit, but meld into previous commit
# f, fixup = like "squash", but discard this commit's log message
# x, exec = run command (the rest of the line) using shell
#
# These lines can be re-ordered; they are executed from top to bottom.
#
# If you remove a line here THAT COMMIT WILL BE LOST.
#
# However, if you remove everything, the rebase will be aborted.
#
# Note that empty commits are commented out

After I saved and closed, it then opened up the commit I renamed and I saved that with “:wq” as well.

Finish the rebase with:

git rebase --continue

Force push the commit to Github.com with this:

git push origin master --force

Create JSX Project

Create React folder in www with this code:

# Create a project folder
mkdir jsx-modules
cd jsx-modules

# Create an npm project without prompts (-y)
npm init -y

# Install babel
npm install @babel/cli @babel/core @babel/plugin-transform-react-jsx

Next we’ll need a .babelrc which will tell babel how to process our jsx.

{
  "plugins": [
    ["@babel/plugin-transform-react-jsx", { "pragma": "createElement", "pragmaFrag": "'fragment'" }]
  ],
  "comments": false
}

And then add an index.jsx file

// A jsx pragma method to create html dom elements
function createElement(tag, props, ...children) {
	if (typeof tag === "function") return tag(props, children)
	const element = document.createElement(tag)

	Object.entries(props || {}).forEach(([name, value]) => {
		if (name.startsWith('on') && name.toLowerCase() in window)
			element.addEventListener(name.toLowerCase().substr(2), value)
		else element.setAttribute(name, value.toString())
	})

	children.forEach((child) => {
		appendChild(element, child)
	})

	return element
}
const appendChild = (parent, child) => {
	if (Array.isArray(child))
		child.forEach((nestedChild) => appendChild(parent, nestedChild))
	else
		parent.appendChild(
			child.nodeType ? child : document.createTextNode(child)
		)
}
const createFragment = (props, ...children) => {
	return children
}

// Setup some data
const name = 'Geoff'
const friends = ['Sarah', 'James', 'Hercule']

// Create some dom elements
const app = (
  <div className="app">
    <h1 className="title"> Hello, world! </h1>
    <p> Welcome back, {name} </p>
    <p>
      <strong>Your friends are:</strong>
    </p>
    <ul>
      {friends.map(name => (
        <li>{name}</li>
      ))}
    </ul>
  </div>
)

// Render our dom elements
window.document.getElementById('app').replaceWith(app)

Now you can run this command to generate your javascript.

npx babel index.jsx -d dist

Which will create a new dist/index.js file with the transpilled code.

You can add // eslint-disable-next-line no-unused-vars to ignore annoying eslint errors

And to test our code, add an index.html

<!DOCTYPE html>
<html lang="en">
  <head>
    <meta charset="UTF-8" />
    <meta name="viewport" content="width=device-width, initial-scale=1.0" />
    <meta http-equiv="X-UA-Compatible" content="ie=edge" />
    <title>jsx WITHOUT react</title>
    <link
      rel="stylesheet"
      href="https://cdn.jsdelivr.net/gh/kognise/water.css@latest/dist/light.min.css"
    />
  </head>
  <body>
    <div id="app"></div>
    <script src="dist/index.js"></script>
  </body>
</html>

I snuck in water.css to make raw html prettier.

Create React Project

Create React folder in www with this code:

npx create-react-app react-modules

Once all the necessary files are installed, change directory into react-modules and start the application with:

npm start

Build the files ready to go to production:

npm build


We are creating buttons that open a modal window where the content of the modal window changes with each button.

Add this line to dependencies in package.json

"axios": "^0.24.0",

Update packages with this command: npm update

Open App.js

import React from "react";
import axios from "axios";
import "./styles.css";
class App extends React.Component {
	state = {
		show: false,
		content: "",
		title: "",
	};
	removeHTML(string){
		const regex = /(<([^>]+)>)/ig;
		const result = string.replace(regex, '');
		return result;
	}
	showModal = getContent => {
		if (typeof getContent === 'string' || getContent instanceof String){
			axios({
				method: "get",
				url: "http://api.tvmaze.com/search/shows?q="+getContent,
			}).then((response) => {
				let movies = response.data;
				let match = false;
				{movies.map((movie,i) => {
					if( movie.show.language === "English" && match === false ){
						match = true;
						this.setState({
							title: movie.show.name,
							content: this.removeHTML(movie.show.summary)
						});
					}
				})}
			}, (error) => {
				console.log(error);
			});
		}else{
			this.setState({
				content: "",
				title: "",
			});
		}
		this.setState({
			show: !this.state.show
		});
	};
	render() {
		return (
			<div className="App">
				<button
					className="toggle-button centered-toggle-button"
					onClick={e => {
						this.showModal("The Golden Girls");
					}}
				>
					Golden Girls
				</button>
				<button
					className="toggle-button centered-toggle-button"
					onClick={e => {
						this.showModal("Jane The Virgin");
					}}
				>
					Jane The Virgin
				</button>
				{this.state.show && (
					<div className="modal" id="modal">
						<h2>{this.state.title}</h2>
						<div className="content">
							{this.state.content}
						</div>
						<div className="actions">
						  <button className="toggle-button" onClick={this.showModal}>
							close
						  </button>
						</div>
					</div>
				)}
			</div>
		);
	}
}
export default App;

Add modal css to styles.css

.App {
  font-family: sans-serif;
  text-align: center;
}
.modal {
  position: absolute;
  left: 50%;
  top: 50%;
  transform: translate(-50%, -50%);
  background: white;
  border: 1px solid #ccc;
  transition: 1.1s ease-out;
  box-shadow: -2rem 2rem 2rem rgba(0, 0, 0, 0.2);
}
.modal h2 {
  border-bottom: 1px solid #ccc;
  padding: 1rem;
  margin: 0;
}
.modal .content {
  padding: 1rem;
}
.modal .actions {
  border-top: 1px solid #ccc;
  background: #eee;
  padding: 0.5rem 1rem;
}
.modal .actions button {
  border: 0;
  background: #78f89f;
  border-radius: 5px;
  padding: 0.5rem 1rem;
  font-size: 0.8rem;
  line-height: 1;
}
button.centered-toggle-button {
  margin: 0 10px;
}
button {
	cursor: pointer;
}

Set Up Docker Python

Requirements:
Install Python and Docker

Create folder on computer named docker-python and follow steps below:

cd /path/to/python-docker 
pip3 install Flask 
pip3 freeze | grep Flask >> requirements.txt 

Create app.py file and add this code

from flask import Flask
app = Flask(__name__)

@app.route('/')
def hello_world():
    return 'Hello, Docker!'

Create a Dockerfile for Python

# syntax=docker/dockerfile:1

FROM python:3.8-slim-buster

WORKDIR /app

COPY requirements.txt requirements.txt
RUN pip3 install -r requirements.txt

COPY . .

CMD [ "python3", "-m" , "flask", "run", "--host=0.0.0.0"]

Directory structure is now:

python-docker
|____ app.py
|____ requirements.txt
|____ Dockerfile

Build an image:

docker build --tag docker-python .

Run your image as a container with ability to open in browser

docker run --publish 5000:5000 docker-python

Test in terminal to see if works

curl localhost:5000
Hello, Docker!

Check Docker Desktop and you should see it listed as a running container with ability to open in browser!

WordPress Data Sanitization/Escaping

Sanitization: Securing Input

Sanitization is the process of cleaning or filtering your input data. Whether the data is from a user or an API or web service, you use sanitizing when you don’t know what to expect or you don’t want to be strict with data validation.

The easiest way to sanitize data is with built-in WordPress functions.

The sanitize_*() series of helper functions provide an effective way to ensure you’re ending up with safe data, and they require minimal effort on your part: